
How to Automate Payments and Invoices Posting in Dynamics BC?
- Apr 5, 2022
- 3 min read

Co-authored by Nikita Jatania - Dynamics 365 Consultant
Automation can be done effectively in Dynamics Business Central in order to optimize business transactions. Dynamics 365 Business Central has number of tools that enable businesses to eliminate duplication of effort and automate common procedures, therefore saving time and resources. One such D365 hack is connecting invoices and payments.
It can be applied when the payment is made at the same time that the invoice is being prepared, or when payments are made in advance. The auto-payment feature can be used while the invoice is being created.
Invoices must be paid in accordance with the terms and conditions mentioned in the invoice; this includes bank transfers, NEFT transfers, UPI payments, cash payments, and any other payment methods as specified in the invoice.
D365 Business central offers the ability to auto-post payments as you post the invoices. All you have to do is configure the Payment Methods and you’re done.
How to do it in 4 Steps?
Step 1: Enter Payment Method
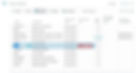
Begin with a search for Payment Methods in Business Central in the global search box. Open the option for Payment Methods as shown in image 1 and fill in the necessary information in the payment method setup. Make sure you include the method code, description, and the Balance account number (shown as Bal. Account No.) in the payment method code.
A very important note: This automation will only work if the Balance account information is correctly entered. The red box in image 1 is where Bal. Account No. is displayed. Without entering this detail, we cannot apply auto-payments.
Image 1: Payment Method View
Step 2: Create an Invoice
Next, you'll want to browse the invoicing option. We can either create a purchase invoice or a sales invoice. We'll use a purchase invoice as an example.
Enter “purchase invoice” in the global search box and click to open the panel seen in image 2. (For Sales type “sales invoice)
Image 2: Purchase Invoice

Step 3: Select Payment Method in the Invoice
In the purchase invoice select Payment Method Code. You can choose Cash, Bank Transfer, UPI, etc. Before you begin, make sure you've set up the payment as directed in Step 1.
Image 3: Selecting Payment Method in Invoice

Step 4: Complete Invoice
Fill out the rest of the invoice information as applicable. After completing the form, click the Post option indicated in image 4.
Image 4: Posting Invoice

Result
You may now verify the vendor's status to ensure that payment was made in compliance with the invoice by using the same document number as the invoice. Additionally, it is added automatically to the invoice, reducing the outstanding balance to zero.
Each time you produce an invoice, the system will automatically apply payment depending on the Bal. Account No. indicated in the Payment Method, as illustrated in image 5.
Image 5: Result – Payment and Invoice Created

This automation eliminates the need for duplicate entry and saves time. Once a payment method is set up for each vendor/customer, it is not necessary to repeat the process. Following one-time setup, when a Sale or Purchase is completed, all that is required is to select the payment method when creating the invoice.
These types of optimizations actually end up saving a significant amount of time and streamlining the business flow.
If you liked this tutorial, consider following Live D365 for amazing Dynamics 365 related content.


